Showing posts with label SYTYC. Show all posts

Monday, March 22, 2010

Switch it up pillow

Which Pillow to Choose?

Ever asked yourself that same question?

The 'Switch It Up' Pillow gives you several different looks..... so your home can have it all this year.


The pillow features several 'panels' that can be interchanged, as fast as your mood changes.

I love love love how I did the crazy lines around the edges of the panels...I seems more like a doodle then sewing if you ask me!


Store the additional 'panels' in the zipper compartment in the back.

*note* this was my first zipper back pillow....I was surprised that it really was super easy to do and was nice to have a place to store the other parts of the pillow


Take one out, and attach it to the front.


The front has been stitched with the word "SPRINGTIME"


Now you can have the fun 'Switch It Up' pillow too. My Panels include a flower, a bumble bee (with a 'flappy' wing) and an Easter egg. You can use my patterns or make your own panels for your pillow. Your sure to make a statement with your original pillow.


Love,

Friday, March 19, 2010

BUNKBED CLUBHOUSE

This just HAD to be one of my favorite projects!

If I can find enough pictures I will post a tutorial for this soon....
We made this in 4 days.


I would NEVER suggest that. My kids and I were completely consumed with making this clubhouse! However, it wasn't difficult, just a lot of steps, the only challenging thing was sewing the tree trunk and tree top on to the large piece of blue felt, maneuvering that much felt through a sewing machine was difficult.

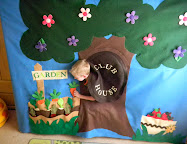
Here is the CLUBHOUSE


....a craft kids can help make? Boy oh boy did my kids have some grand ideas. I let them take the reins and they ran with it! They loved the felt clubhouses that people make to go over their card tables.... however, I didn't want a card table set up in the house all the time. So we made a compromise.

And the bunk bed club house was born


Enter through the 'hole' in the tree, which is made to be level with the bottom bunk.


Complete with a tree that has velcro for apples or flowers....(and for future banana's and letter's like the chicka chicka boom boom tree)


There is also a garden with pockets to hold carrots, beets and turnips.
Okay, so not the tastiest veggies, but I was looking for different colored and shaped root veggies.


Store your harvest from the garden or tree in the basket....or maybe you'll want to put flowers in the basket instead. (the basket is open to hold all sorts of goodies)


This project was started and finished within the week...but I think it would make a fun summer vacation project!

There is plenty or tracing, cutting and simple sewing to keep all ages happy.

Each fruit, veggie and flower if stuffed with batting and looks great from the front and back. The main parts of the tree and garden have been satin stitched around the edges, and the flap for the hole is double layered and reinforced.

It's great that the kids can attach this to the bunk bed, and easily take it down....no need to use every blanket in the house now, not when you have your own bunk bed clubhouse!


My kids have kept this up almost everyday since it has been made about 3 weeks ago.
Kyler likes to keep it up when he sleeps and
on the weekend both boys have a 'campout' in the clubhouse!
We also noticed that instead of taking it all the way down we can slide the entire clubhouse to one side of the bunk!


Love,

Monday, March 8, 2010

Sailboat Shower curtain and towels


Thanks to all who voted for me!


We are loving our new bathroom set-up! So here it is the sailboat shower curtain and towels.


Arrr Matey!

Calling all Captains! Get ready to set sail on the 'bubbly' sea. bring your floaty toys and your wash cloth!

Let the adventure begin for the little boys in your life with this Appliqued shower curtain and towels.


Your little captains will take adventure to the high seas every time they take a bath.


So when it's time to 'swab the decks' they may just listen!


Complete with this on the back!


Love,

Week 6....and a look back

Yipee! I made it to the final 5 of SYTYC...My goal has been met! Im even happier that my crafts have had good votes, and usually made it into 2nd place (that way i dont have to write a tutorial) Well, it's time once again to go on over and VOTE.

Here's a look at past crafts...a walk down memory lane ;-)

The food cozy posted here and tutorial here:


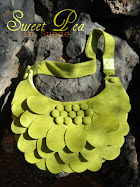
The sweet pea purse shown here:


The sailboat shower curtain shown here: here is the tutorial


The re usable lunch bag shown here and a tutorial here:


The gidget dress shown here and a tutorial here:


The carseat blanket shown here:


Love,

Monday, March 1, 2010

Retro Week and the Gidget dress

This was my submission for last weeks theme of 'Retro'


The Gidget Dress.....

Perfect for friends.....


Perfect for playing.....


Perfect for hugging.....


The Gidget dress is easy enough for a beginner. Made from linen, it lightly flows and is the perfect breathable fabric for spring and summer!

And as long as you are making one dress, you may as well make three so all the friends can match!

Made from a simple a-line dress. I will show you how I designed and made these simple dresses using clothes you own as a pattern OR by cutting up a cheap pattern to re-design your own.

These dresses have coordinating fabric buttons on the front (which I made with the linen from the dress). This dress also has a simple button down back that DOESN'T use button holes...So if you have been intimidated by button holes, there is no excuse to not make your own Gidget dress!

Here are some other Gidget pictures:


A very special thank you to sweet little Kennedy, Millie and Emma....seriously aren't they ADORABLE!!! Also, to my sister in law Maricela for taking the pictures, you can see more of her pictures on her blog here.

Love,

Tuesday, February 23, 2010

In the Kitchen

Here was my entry for last week in SYTYC. These have been a hit at our house already!


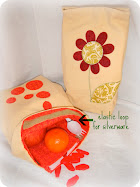
Pack up some kitchen lovin' with these reusable lunch bags, complete with matching reusable snack and sandwich bags.


Pick out lining to reflect who each bag belongs too. The reusable bags co-ordinate too, and are lined (with a 'plastic' like feel) so that they can be wiped clean. There is even a spot for your napkin and silverware to go.


Send them to school or pack them up for the park, just make sure you have your lunch bag packed and ready to go!


Love,

Monday, February 22, 2010

Food Cozy tutorial

The food cozy tutorial

You will find that this project can easily be done in an afternoon.

Enjoy!


This really is an easy project to make

You need

1/2 yard quilted material* Buy 3/4 yard if you are nervous about cutting ;-)

*This is to make a basic food cozy like the one pictured, if you want it insulated you will need a few other things i will add those to the bottom of the post


3/8 inch dowel cut into (2) 12 inch pieces

1 package double fold bias tape

.........................................................................

Cut material into three pieces.
One piece measuring 14 inches by 24 inches

Two (2) pieces measuring 9 inches by 13 inches


Sew bias tape around three sides of the two 9 x 13 inch pieces. There is NO need to add the bias tape to one of the 9" sides as they will be sewn into the larger piece.


In the larger 14 x 24" piece, cut to half circles from the center at both ends (the 14 inch sides). Yep, I just used a good old bowl from my kitchen to use as my guide


Lay the 9x13 inch pieces on top of the larger piece with the edge having no bias tape even with the long edge of the larger piece....(Flaps WILL overlap)


Pin flaps on.


Now sew bias tape ALL the way around the whole perimeter. When the bias tape hits the long sides you will be using the bias tape to cover BOTH the edge of the 9x13 piece ALONG with the section of the larger piece.


You should now have the MAIN section of your carrier done. EASY right? I hope at least ;-)

Now you need to make 4 loops for the dowels to rest in. This can be done an easy way by simply folding over the top edges and stitching them down about an inch lower....Does that make sense???? Okay this was a crazy part of my week and I dont have pictures...I will try and draw some pictures up tomorrow to add to this, perhaps if you look close enough to some of these pictures you can kind of get an idea of what I am talking about. It's not complicated just a simple fold over for the dowel to rest in...


Add dowels


When you need to wash simply remove the dowels and throw in the washing machine.


**You can make this food cozy and do your own quilting and add your own batting, it makes it a little more substantial, if you use Insul-Bright as your batting it will help keep your food warm or cold.

If you are adding your own batting you will need to double he amount of fabric, you will need a top and bottom piece and the batting in the middle....


I hope this makes sense, trust me it's easy, I will try to add some drawings or better pictures soon, if you are lost, write a comment or send me an email (listed on the left hand side of my blog) and I will try to answer the best I can ;-)


Here is what the original post looked like:


If you’re too busy to give your neighbor a helping hand, then you’re just too darned busy.
Marie T. Freeman


Need to get a meal to someone sick? Dinner to a family with a new baby?

Do you want your Brownies to be warm when you get to a party?
Or maybe you need a housewarming gift?
...You need the food cozy


I love to make meals for those around me. I enjoy this simple act of service that can be accomplished even with a growing family at home.


This carrier was made for under $5.00 and can easily transport a meal from your house to another. This simple pattern was one of my great grandmother's.

So go raid the piggy bank and lets make this inexpensive project together.

Seen on One Pretty Thing

Love,