
See the original post for the lunch bag here.


It's time to make your own lunch bag! You can see the original post for the lunch bags here. So lets gather some supplies.
1/2 yard outside bag material. I used a small cordorouy in a creamish tan color.
1/2 yard material for lining. I let my kids choose the cotton print they wanted.
velcro
With the cord material. Cut two pieces of 13 x 9.5 inch fabric.
Cut two pieces of liner material 12.5 x 9 inches each.
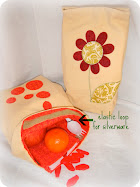
If you want the front of your bag decorated...like the circles on one of mine or the flower on the other, do that now!
Take cord material, with right sides together, sew the sides and bottom of the bag with 1/4 inch seam allowances.
Take the liner, right sides together, and sew the sides and only part of the bottom. Leave aprox. 3" open in the middle bottom of the liner bag. You MUST leave this part open or you will not be able to turn the bag with the liner later on. That's my fingers saying "Hey you, don't sew in this area marked here!"

Also, if you would like a silverware holder, add a piece of elastic cording folded over and sewn into the side of the liner fabric....sorry no picture of this when I did it, but here is a finished picture that you can see the elastic cording holder.

Put the long seams together and then iron down. This will make a diamond shape at the bottom of the bag. Iron the 'diamond' down. Do this for both the cord and the liner.

Measure 3 inches across the bottom and top point of the diamond. (Just so you know, you can actually change the 'depth' of your bag by changing how much you sew and cut off the corner of your bag in this step)

Mark the 3 inch line and then sew.

Cut off the corner's aprox 1/4 inch from the seam you just sewed.

Do this step for both the cord and the liner.

Flip the cordorouy bag right side out. keep liner as it is.
Sew your velcro to the right sides of the liner. When you are done you just need to make sure the bag is flipped inside out. Hmmmm, no picture of this, but you can figure it out ;-)
Put the cord bag INSIDE the liner bag so that the RIGHT side of the liner and the RIGHT side of the cord are facing each other.

Sew the cord to the liner all the way around the top.

Then pull cord bag out the hole that was left in the bottom of the liner bag....Honestly isn't that such a cool trick. That's how you make ANY lined bag. hand stitch the hole in the liner....or if you are lazy like me, just sew it shut, I'm not too worried of my kids lunch bag doesn't have an invisible seam ;-)

Shove the liner into the the bag.

Walla your done!
I will try to be better at putting where things are linked up too...Whitnee at Sew What posted this tutorial here. also linked to some sites listed here
Love,


Just this morning as I was packing my son's lunch I decided I needed to sew him a bag for his lunch and Walla you posted this. Reading my mind maybe??? Thanks!!!!
ReplyDeleteI love the cute lunch bag. Thanks for sharing. Jackie
ReplyDeleteI saw these on SYTYC and am so excited for your tutorial! I think these are darling, and such a great idea! I hope you don't mind if I share a link to your tutorial on sewwhattoday.blogspot.com on March 5!
ReplyDeleteNo one has commented for ages!
ReplyDeleteHello colleagues, how is all, and what you would like to say about this
ReplyDeleteparagraph, in my view its genuinely awesome for me.
Also visit my web site: Free Psn Codes