
The food cozy tutorial
You will find that this project can easily be done in an afternoon.
Enjoy!
You will find that this project can easily be done in an afternoon.
Enjoy!


This really is an easy project to make
You need
1/2 yard quilted material* Buy 3/4 yard if you are nervous about cutting ;-)
*This is to make a basic food cozy like the one pictured, if you want it insulated you will need a few other things i will add those to the bottom of the post
3/8 inch dowel cut into (2) 12 inch pieces
1 package double fold bias tape
.........................................................................
Cut material into three pieces.
One piece measuring 14 inches by 24 inches
Two (2) pieces measuring 9 inches by 13 inches


Sew bias tape around three sides of the two 9 x 13 inch pieces. There is NO need to add the bias tape to one of the 9" sides as they will be sewn into the larger piece.
In the larger 14 x 24" piece, cut to half circles from the center at both ends (the 14 inch sides). Yep, I just used a good old bowl from my kitchen to use as my guide


Lay the 9x13 inch pieces on top of the larger piece with the edge having no bias tape even with the long edge of the larger piece....(Flaps WILL overlap)
Pin flaps on.
Now sew bias tape ALL the way around the whole perimeter. When the bias tape hits the long sides you will be using the bias tape to cover BOTH the edge of the 9x13 piece ALONG with the section of the larger piece.


You should now have the MAIN section of your carrier done. EASY right? I hope at least ;-)
Now you need to make 4 loops for the dowels to rest in. This can be done an easy way by simply folding over the top edges and stitching them down about an inch lower....Does that make sense???? Okay this was a crazy part of my week and I dont have pictures...I will try and draw some pictures up tomorrow to add to this, perhaps if you look close enough to some of these pictures you can kind of get an idea of what I am talking about. It's not complicated just a simple fold over for the dowel to rest in...
Add dowels
When you need to wash simply remove the dowels and throw in the washing machine.
**You can make this food cozy and do your own quilting and add your own batting, it makes it a little more substantial, if you use Insul-Bright as your batting it will help keep your food warm or cold.
If you are adding your own batting you will need to double he amount of fabric, you will need a top and bottom piece and the batting in the middle....
I hope this makes sense, trust me it's easy, I will try to add some drawings or better pictures soon, if you are lost, write a comment or send me an email (listed on the left hand side of my blog) and I will try to answer the best I can ;-)

Here is what the original post looked like:
If you’re too busy to give your neighbor a helping hand, then you’re just too darned busy.
 Marie T. Freeman
Need to get a meal to someone sick? Dinner to a family with a new baby?
Do you want your Brownies to be warm when you get to a party? Or maybe you need a housewarming gift?
...You need the food cozy

I love to make meals for those around me. I enjoy this simple act of service that can be accomplished even with a growing family at home.

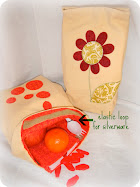
This carrier was made for under $5.00 and can easily transport a meal from your house to another. This simple pattern was one of my great grandmother's.
So go raid the piggy bank and lets make this inexpensive project together.
Seen on One Pretty Thing
Love,

 Marie T. Freeman
Need to get a meal to someone sick? Dinner to a family with a new baby?
Do you want your Brownies to be warm when you get to a party? Or maybe you need a housewarming gift?
...You need the food cozy

I love to make meals for those around me. I enjoy this simple act of service that can be accomplished even with a growing family at home.

This carrier was made for under $5.00 and can easily transport a meal from your house to another. This simple pattern was one of my great grandmother's.
So go raid the piggy bank and lets make this inexpensive project together.
Seen on One Pretty Thing
Love,


Thanks for sharing Kristin! I can't wait to make one!
ReplyDeleteI was invited to a bridal shower and wanted to make one of these. Perfect timing...and it is fashionable, adorable and FUNCTIONAL! Great job!
ReplyDeleteI always get irritated when none of my bags have a large enough rectangular base to keep a casserole dish stable in transit. This is a perfect solution!
ReplyDeleteI love this! It makes it extra special when taking to someone. Thanks for sharing.
ReplyDeleteThis comment has been removed by a blog administrator.
ReplyDeleteConsider your wall colors or rooms look for choosing the best fan.
ReplyDeleteS. Depending on the homeowner's choice, they can either have up lights or down lights in them.
My page - hampton bay ceiling fans with lights and remote install instructions